

MCP Server
What is MCP?
The Model Context Protocol (MCP) is an open protocol that standardizes how AI assistants connect to external data sources and tools. The ShipBob MCP Server acts as a bridge between your AI assistant and the ShipBob API, enabling natural language interactions with your fulfillment operations.
Transport Protocol
The ShipBob MCP Server uses Streamable HTTP transport, which provides:
- HTTP-based communication for easy integration
- Server-Sent Events (SSE) support for real-time streaming responses
- RESTful architecture compatible with standard HTTP clients
- Stateful sessions for maintaining connection context
- HTTP-Based: Uses standard Streamable HTTP transport for broad compatibility
This transport method is ideal for web-based AI assistants and provides reliable, secure communication over HTTPS.
Key Benefits
- Natural Language Interface: Ask your AI assistant to check orders, view inventory, or browse products using plain English
- AI-Powered Workflows: Let AI assistants help automate routine ShipBob tasks
- Secure Access: All API calls use your existing ShipBob authentication credentials
- Real-Time Data: Get live information about orders, inventory, and shipments
- Developer Friendly: Works with popular AI development tools like Claude Desktop and VS Code
Prerequisites
Before you begin, you’ll need:
- ShipBob Account:
- Sandbox (for testing): Sign up for sandbox
- Production (for live data): Sign up at production
- AI Assistant: claude.ai, ChatGPT, Claude Desktop, VS Code with GitHub Copilot, or another MCP-compatible client
- Browser: The primary setup uses OAuth in your browser — no API tokens to generate or paste
Quick Start
The ShipBob MCP Server is hosted and maintained by ShipBob. You don’t need to install or run any server software — simply configure your AI assistant to connect to it. Setup is the same across every AI app that supports MCP:
- Open your app’s MCP or connector settings
- Add a new server with the ShipBob URL
- Your app opens a browser window where you sign in to ShipBob
- Grant access on the consent screen
- Start asking the assistant about your data
Server URLs
Use the URL that matches the environment you want to talk to.
What the Consent Screen Asks For
On first connection, ShipBob asks you to create a channel for the AI client and shows the permissions the MCP tools need to function. A channel is how ShipBob tracks which app created which records — it is an installation of an application on top of the ShipBob API, and it controls what the AI client is allowed to write.
- Reads cross channels: The AI client can read data from every channel on your merchant account (orders from Shopify, Amazon, other apps, PAT-issued channels, etc.).
- Permissions follow your account role: The tools available to you depend on your ShipBob account’s permission level. If a tool returns a 403 error, your account role may not have access to that operation — contact your ShipBob account admin to confirm.
- Writes stay in the channel created at consent: Create, update, and cancel operations only apply to records on the channel you created at the consent screen. The AI client cannot write into channels owned by other applications.
403 (or sometimes 404).Configure Your AI Assistant
claude.ai
Step 1: Open your Connectors settings
Open claude.ai in your browser. From the sidebar, go to Customize → Connectors.
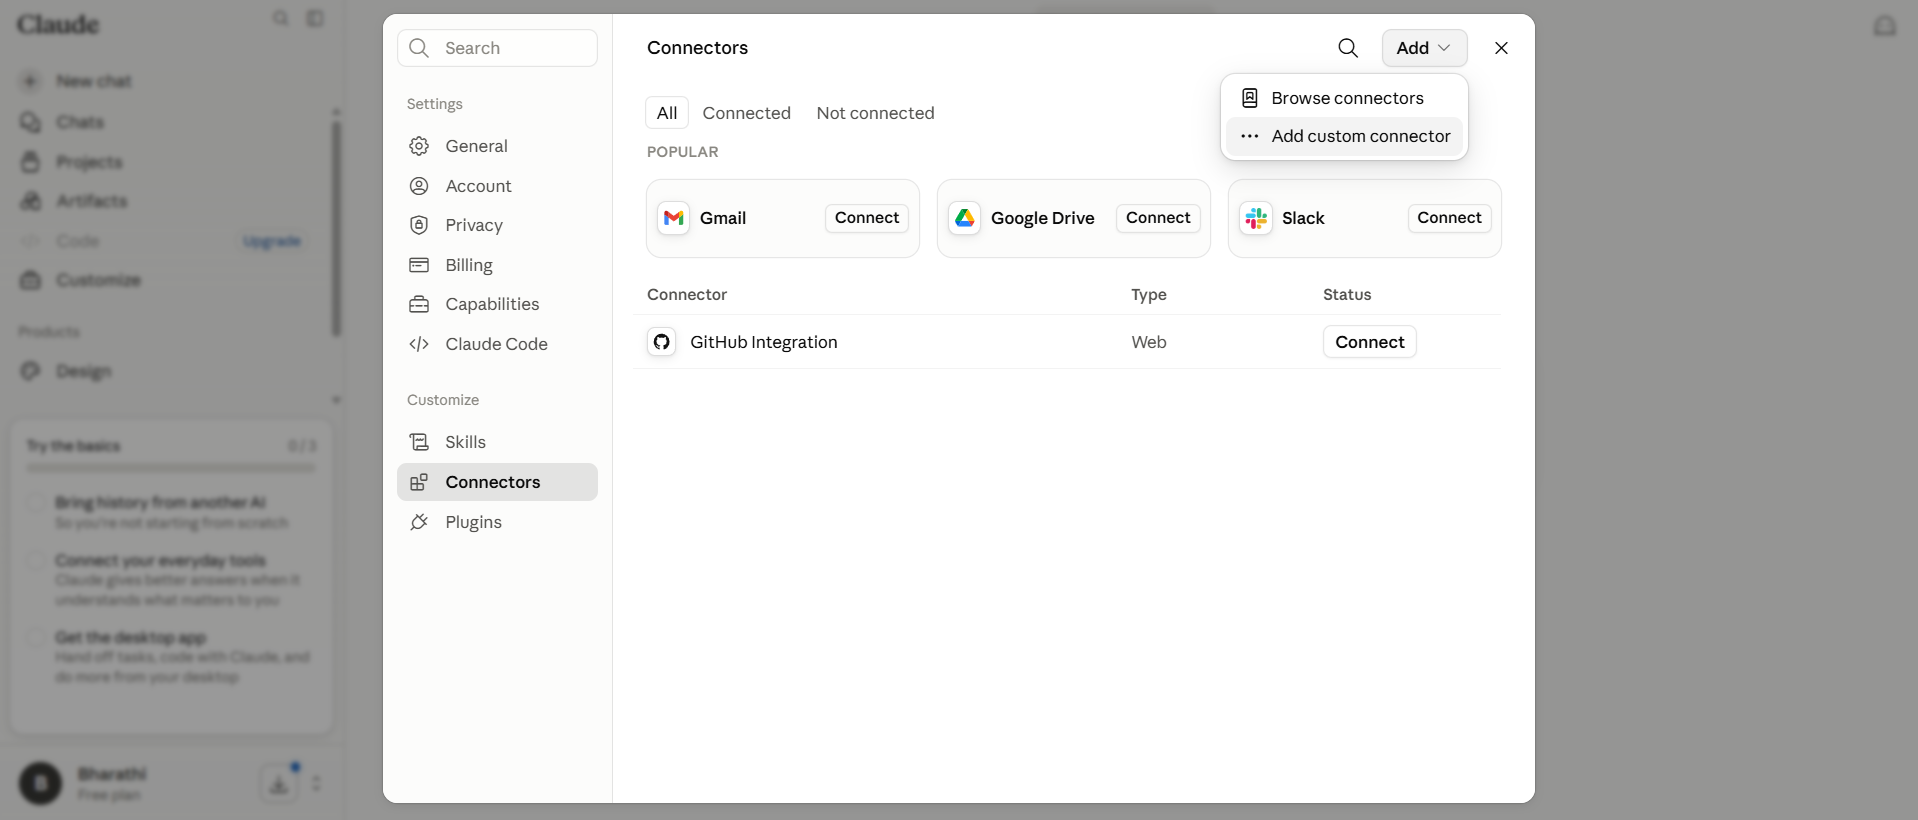
Step 2: Add a custom connector
Click the + icon → Add custom connector. Enter the name ShipBob and paste the server URL for your environment. Click Add.
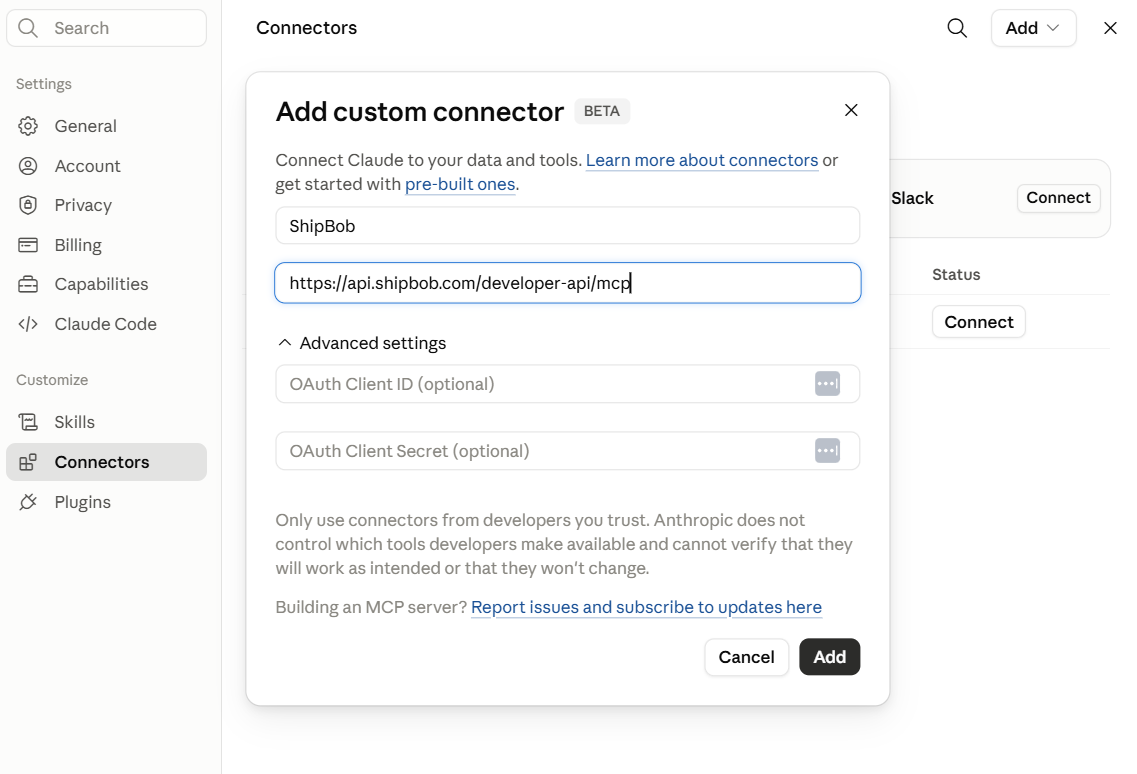
Or use a direct deep-link:
- Production:
Add ShipBob (Production) - Sandbox:
Add ShipBob (Sandbox)
Step 3: Sign in and grant access
Claude opens a browser tab for ShipBob sign-in. Sign in with your ShipBob account and approve the permissions on the consent screen.
Step 4: Verify the connector is connected
Back in your claude.ai settings, the connector shows as Connected.
ChatGPT
ChatGPT supports remote MCP servers as custom connectors (“Apps”). The flow mirrors claude.ai — paste the ShipBob URL, then sign in through the browser tab ChatGPT opens.
Prerequisites
- A ChatGPT Plus, Pro, Business, Enterprise, or Edu account (custom connectors are not available on Free).
- Developer Mode enabled on your account (see Step 1).
Step 1: Enable Developer Mode
Sign in to chatgpt.com, then open Settings → Connectors (labeled Apps & Connectors on newer accounts) → Advanced settings and toggle Developer mode on.
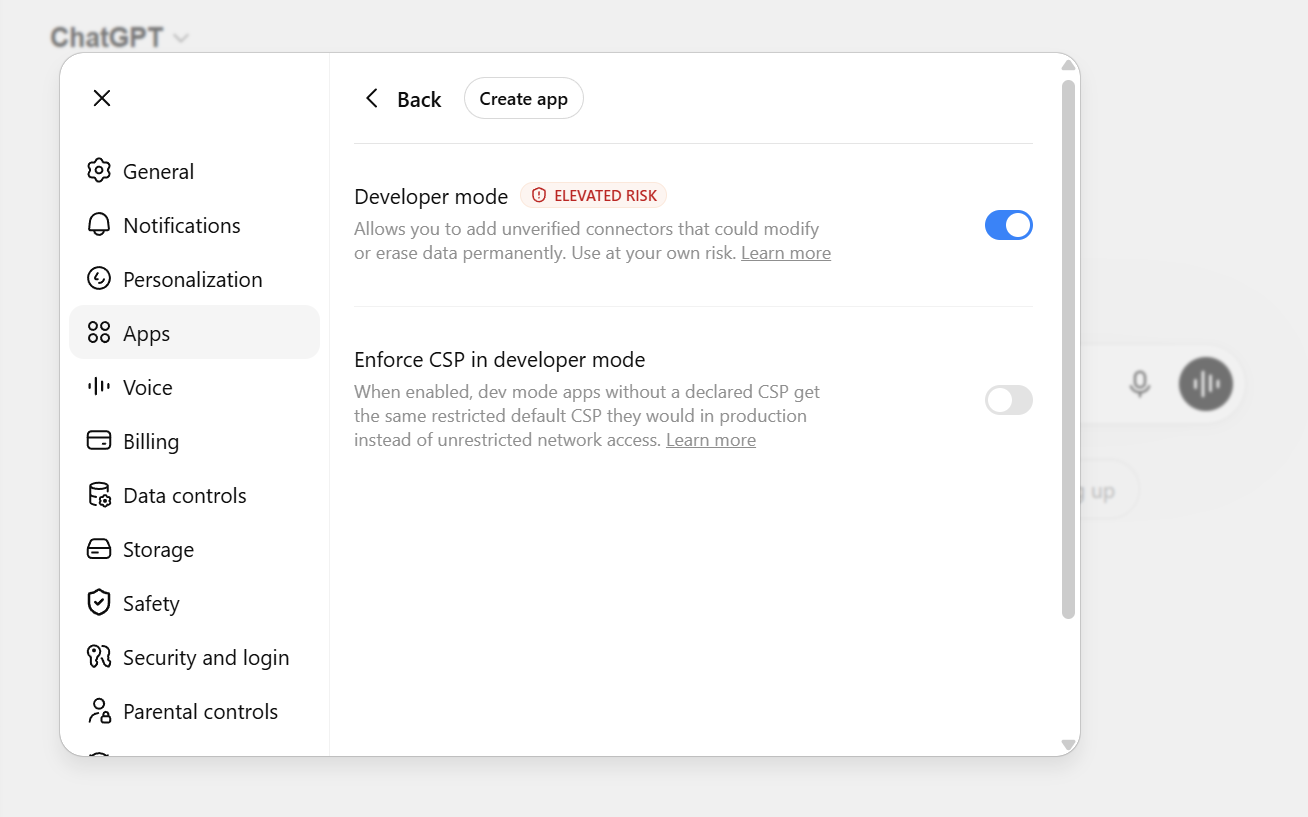
Step 2: Add a custom connector
Back on the Connectors page, click Add (or Create) to add a custom connector. Fill in:
- Name:
ShipBob - MCP Server URL: the URL for your environment
- Authentication: OAuth (leave the default — ShipBob’s server drives the OAuth flow itself, no client ID/secret needed)
Click Create.
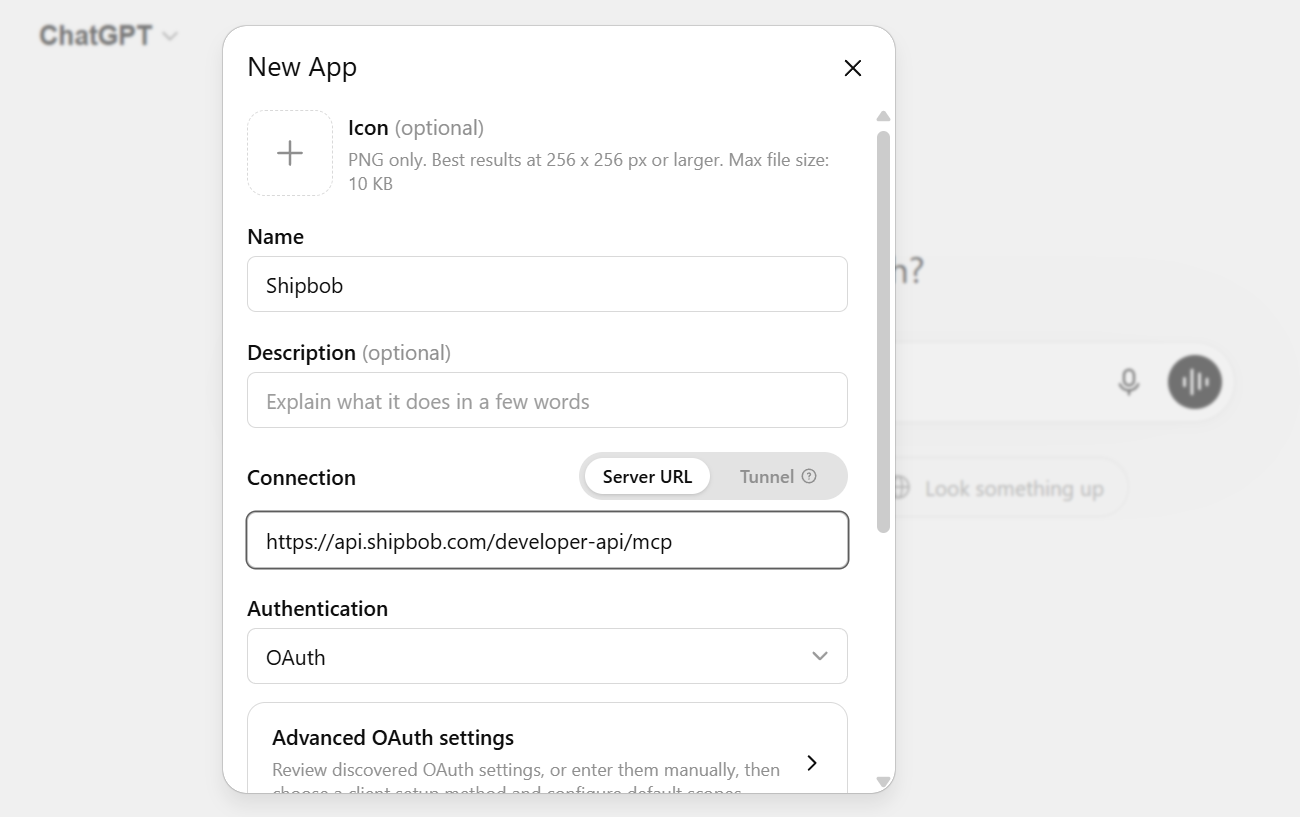
Step 3: Sign in and grant access
ChatGPT opens a browser tab for ShipBob sign-in. Sign in with your ShipBob account and approve the permissions on the consent screen. The connector then appears as Connected in your ChatGPT settings.
Step 4: Use ShipBob in a chat
In a chat, open the + (attach) menu, pick ShipBob under connectors, and start asking about your data.
Claude Desktop
Step 1: Open Connectors settings
Open Claude Desktop. From the sidebar, go to Customize → Connectors.
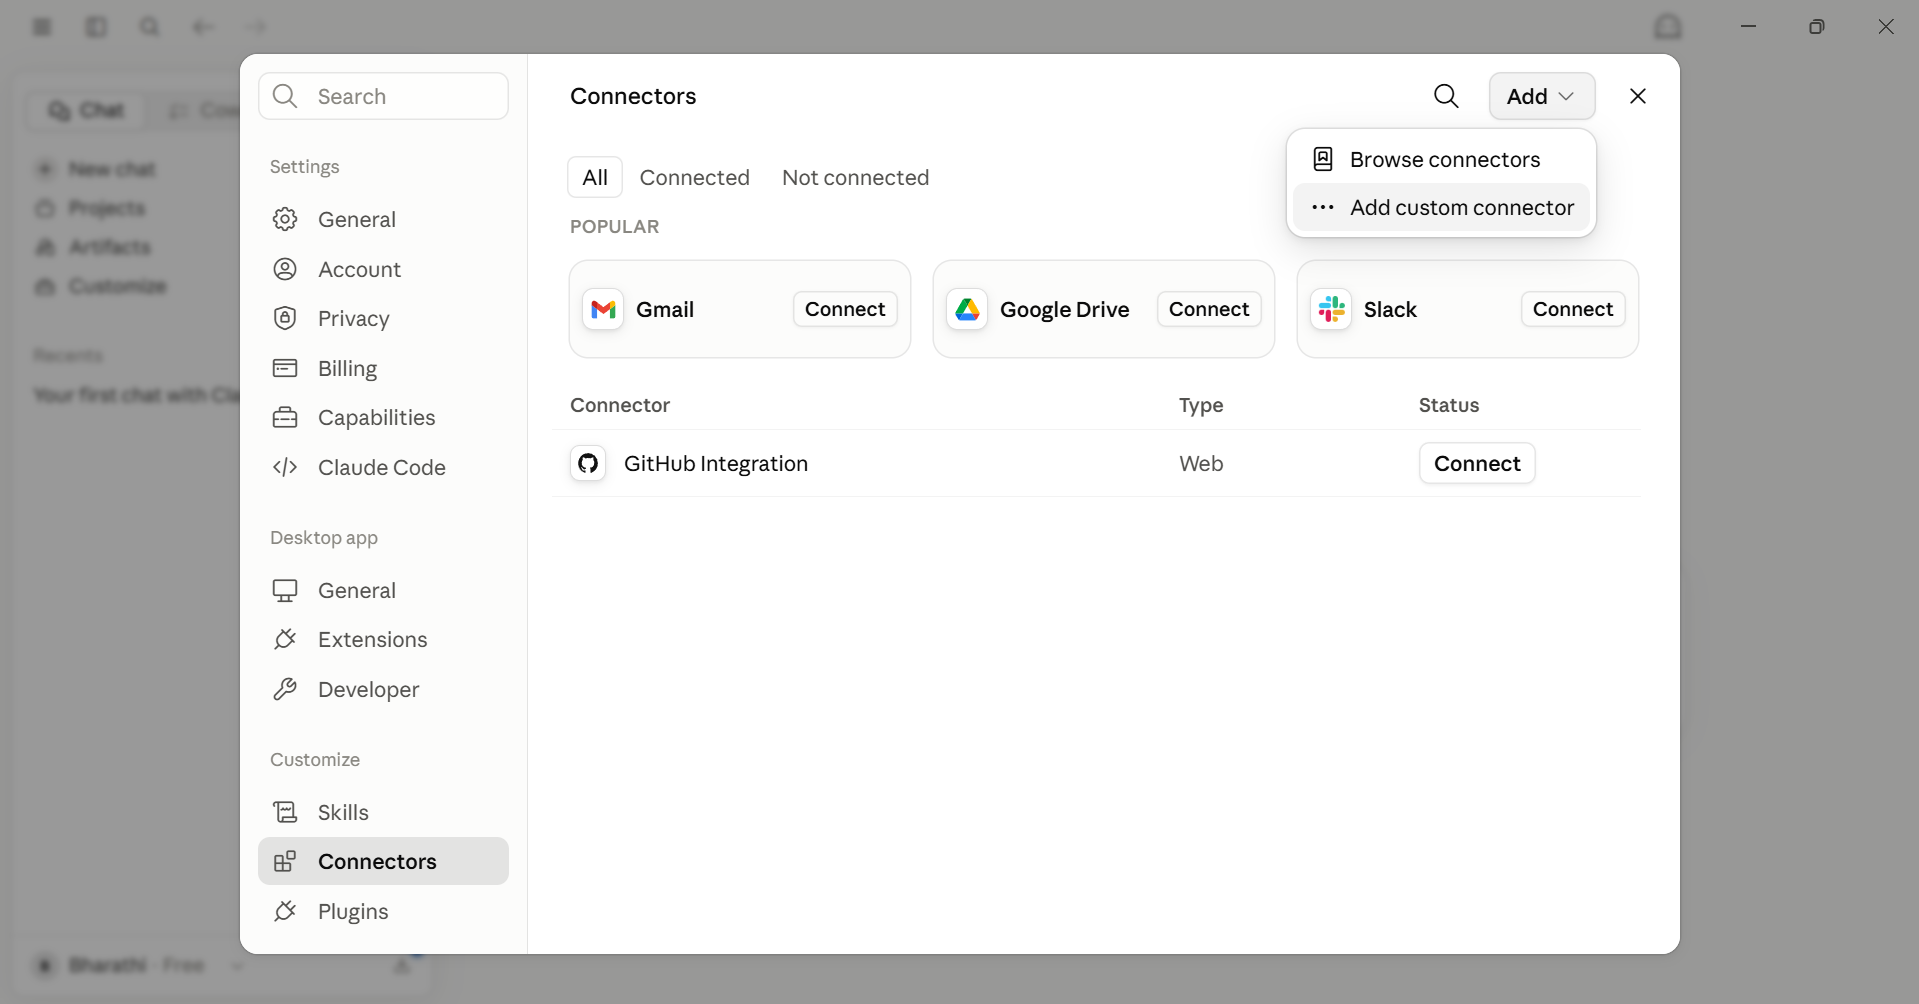
Step 2: Add a custom connector
Click the + icon → Add custom connector. Enter the name ShipBob and paste the server URL for your environment. Click Add.
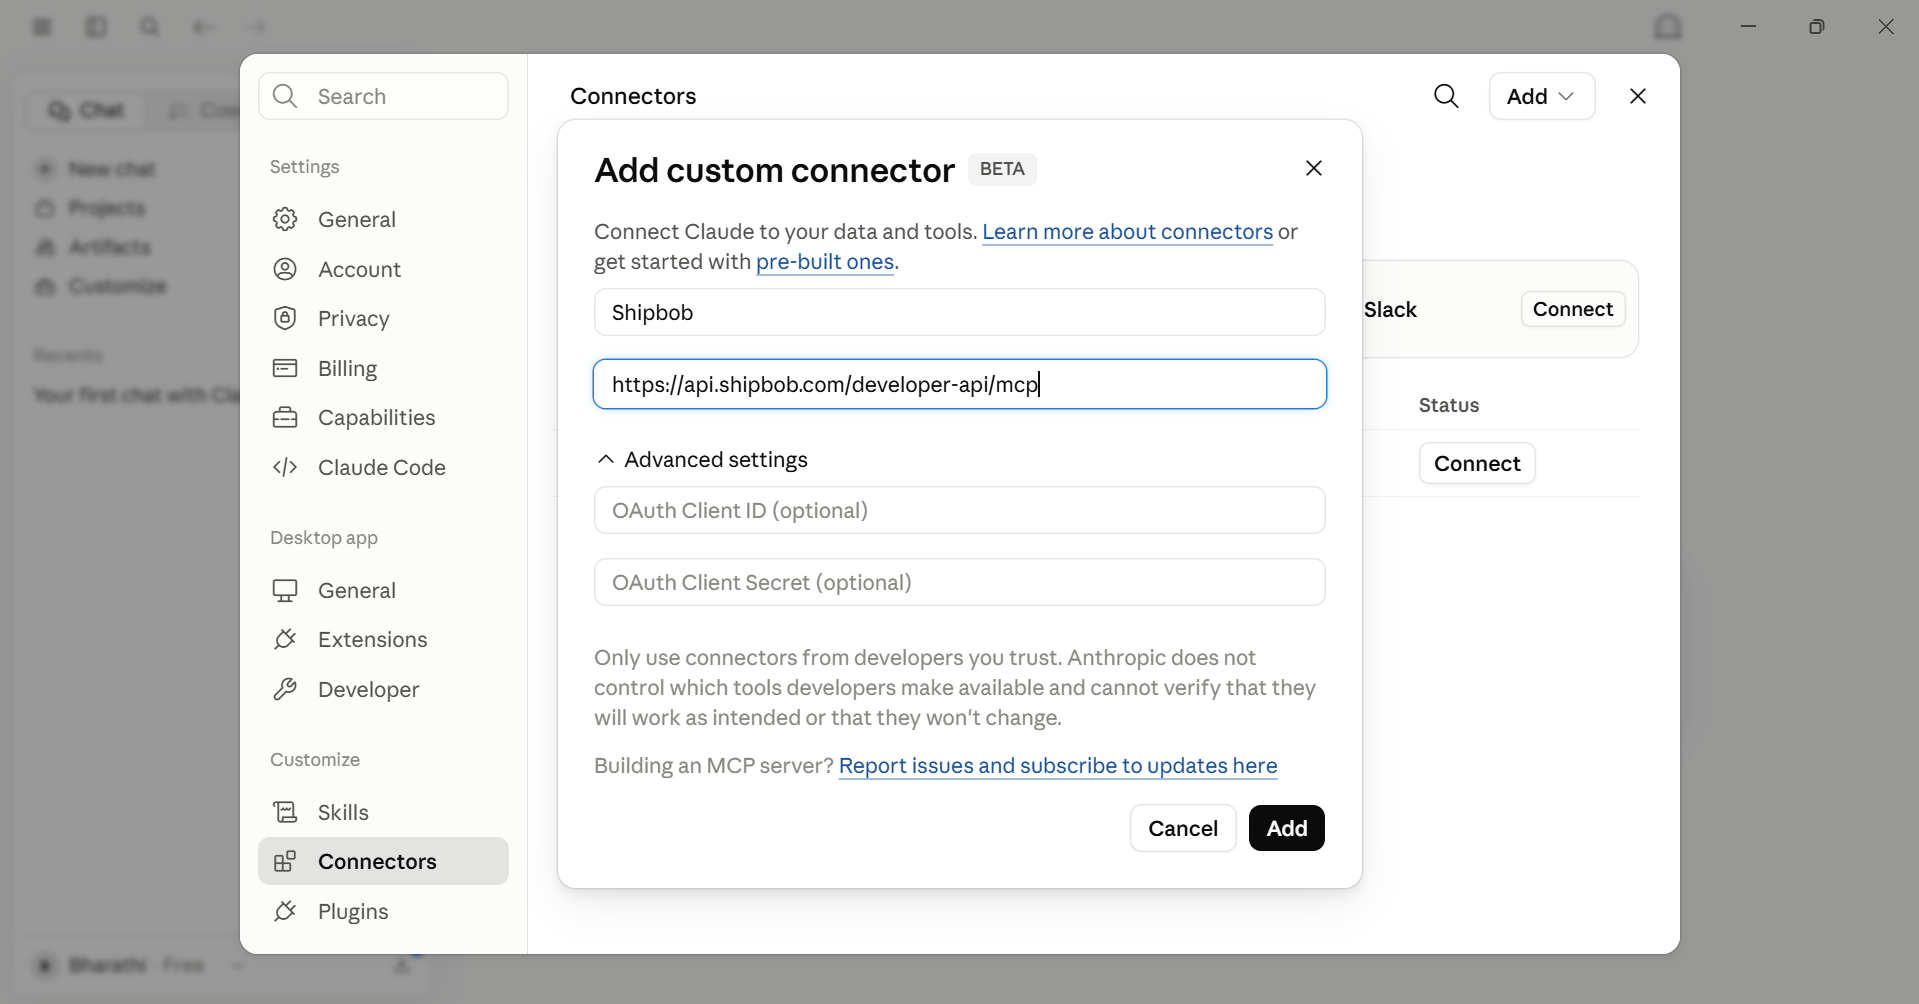
Step 3: Sign in and grant access
Claude opens a browser window for ShipBob sign-in. Sign in with your ShipBob account and approve the permissions on the consent screen.
Step 4: Verify the connector is connected
Back in Claude Desktop, the connector shows as Connected.
VS Code with GitHub Copilot
Prerequisites
- Latest Visual Studio Code
- Access to GitHub Copilot
One-click install:
- Production: Install ShipBob MCP Server in VS Code
- Sandbox: Install ShipBob Sandbox MCP Server in VS Code
VS Code opens a prompt to confirm the server installation. After confirming, it opens a browser for sign-in.
Manual setup:
-
Choose where the MCP config lives:
- Workspace (
.vscode/mcp.json): use this for project-specific access. - User profile (run
MCP: Open User Configurationfrom the Command Palette): use this to make the server available across all your projects.
- Workspace (
-
Add the ShipBob server:
Swap the URL for
https://sandbox-api.shipbob.com/developer-api/mcpto point at sandbox. -
Run
MCP: List Serversand startshipbob. VS Code opens a browser for sign-in. -
Sign in with your ShipBob account and grant access.
mcp.json.Other MCP-Compatible Clients
Any app that supports remote MCP servers works the same way:
- Add a new remote / custom MCP server in the app
- Paste the ShipBob URL for your environment
- Sign in to ShipBob in the browser window your app opens
No API tokens, headers, or extra tools are needed for the OAuth flow.
Verify the Connection
Once the server is added, ask the assistant:
You should see a list of all available ShipBob tools. If nothing appears, see Troubleshooting.
Available Tools
The ShipBob MCP Server currently provides 27 tools to interact with your ShipBob data across the following categories:
Orders (11 tools)
- Get Orders
- Get Order by Order ID
- Get Order Store JSON
- Get All Merchants Shipping Methods
- Get All Shipments for Order
- Get One Shipment by Shipment ID
- Get Logs for One Shipment by Shipment ID
- Get One Shipment by Order ID and Shipment ID
- Get Logs for One Shipment by Order ID and Shipment ID
- Get One Shipment’s Status Timeline by Shipment ID
- Get One Shipment’s Status Timeline by Order ID and Shipment ID
Products (7 tools)
- Gets Taxonomy
- Gets Product by ID
- Gets Taxonomy by ID
- Gets Taxonomy Parent
- Gets Packaging Requirement
- Gets Multiple Product Variants
- Retrieves List of Products Based on Filters Provided
Inventory (8 tools)
- Get Inventory
- Get All Inventories
- Get Inventory Levels
- Get All Inventory Levels
- Get Inventory Levels Grouped by Lot
- Get All Inventory Levels Grouped by Lot
- Get Inventory Levels Grouped by Fulfillment Center
- Get All Inventory Levels Grouped by Fulfillment Center
Channels (1 tool)
- Get Channels
Using ShipBob with Your AI Assistant
Once configured, you can interact with ShipBob using natural language through your AI assistant.
Example 1: Finding Orders That Need Attention
You ask:
AI Response: The assistant will filter orders by shipment status and display orders that are in processing, awaiting fulfillment, or in transit—helping you identify orders that need monitoring.
Example 2: Checking Inventory Levels for a SKU
You ask:
AI Response: The assistant will query inventory levels across all fulfillment centers and provide real-time stock information for that specific SKU.
Example 3: Identifying Low Stock Products
You ask:
AI Response: The assistant will retrieve inventory levels for all products and highlight items with low on-hand quantities, helping you plan reorders and prevent stockouts.
Example 4: Checking Product Details and Variants
You ask:
AI Response: The assistant will retrieve product details including all available variants (sizes, colors, etc.) along with their individual SKUs and inventory levels.
Example 5: Checking Inventory Across Multiple Locations
You ask:
AI Response: The assistant will show inventory distribution across all fulfillment centers, helping you understand stock allocation and plan transfers if needed.
Example 6: Monitoring Order Shipment Timeline
You ask:
AI Response: The assistant will summarize the shipment’s timeline as a list of time-stamped events (for example: shipment created, inventory allocated, fulfilled/shipped, in transit, delivered).
Discovering Available Tools
To see all available ShipBob tools with detailed descriptions, ask your AI assistant:
Security & Best Practices
When using the ShipBob MCP Server, follow these best practices to ensure security:
- Use environment-appropriate accounts: Sign in with a sandbox ShipBob account for the sandbox URL, and a production account for the production URL. The two are fully isolated.
- Review the consent screen carefully: The channel you create at consent controls which records the AI client can write to. See What the Consent Screen Asks For.
- Approve write actions deliberately: Most AI clients prompt you before running write tools (create order, cancel shipment, etc.). Review each action before it executes.
- HTTPS everywhere: Both ShipBob MCP URLs are HTTPS; the OAuth handshake and every tool call are encrypted in transit.
- Understand your account’s role: The tools available to you depend on your ShipBob account’s permission level. Insufficient role permissions surface as
403 Forbiddenerrors.
Troubleshooting
Connection Issues
Problem: AI assistant cannot connect to ShipBob MCP Server
Solutions:
- Verify you’re using the correct endpoint URL:
- Sandbox:
https://sandbox-api.shipbob.com/developer-api/mcp - Production:
https://api.shipbob.com/developer-api/mcp
- Sandbox:
- Check your internet connection
- Ensure your AI assistant supports MCP protocol
- Verify your configuration file syntax is correct
Authentication Errors
Problem: Requests fail with “401 Unauthorized” or “403 Forbidden”
Solutions:
- Re-run the OAuth flow — remove and re-add the ShipBob connector in your AI client to trigger a fresh sign-in.
- Confirm you signed in with the account that matches the environment (sandbox account for the sandbox URL, production account for the production URL).
- For
403on cancel or modify operations: the record likely belongs to a different channel. Writes only work against the channel created at consent — see What the Consent Screen Asks For. - For
403on other tools: your ShipBob account role may not have access to that operation. Contact your ShipBob account admin.
No Tools Available
Problem: AI assistant reports no ShipBob tools are available
Solutions:
- Verify the MCP server configuration in your AI assistant
- Restart your AI assistant after configuration changes
- Check that your API token has the necessary permissions
- Try asking: “What ShipBob tools are available?”
Tool Execution Failures
Problem: Tools execute but return errors
Solutions:
- Check that required parameters are provided
- Verify parameter formats match API requirements (e.g., dates, IDs)
- Review error message for specific guidance
- Consult ShipBob API documentation for parameter details
- Ensure you have permissions for the operation
Rate Limiting
Problem: Requests are being throttled
Solutions:
- Check ShipBob API rate limits
- Reduce the frequency of requests
- Use batch operations when available
Data Accuracy Issues
Problem: Data returned doesn’t match expectations
Solutions:
- Verify you’re using the correct environment (sandbox vs production)
- Check that data exists in your ShipBob account
- Ensure you have the right permissions to view the data
- Try the same query directly in the ShipBob dashboard
Frequently Asked Questions
What AI assistants are compatible?
Any MCP-compatible client with remote server + OAuth support. Tested clients include claude.ai, ChatGPT (custom connectors, on Plus/Pro/Business/Enterprise/Edu plans with Developer Mode), Claude Desktop (via custom connector), Claude Code CLI, and VS Code with GitHub Copilot. Any other modern MCP client that supports remote servers over Streamable HTTP will also work.
Is there a cost to use the MCP Server?
The MCP Server is free to use for ShipBob customers.
Can I use this in production?
Yes! Use the production endpoint (https://api.shipbob.com/developer-api/mcp) with your production API credentials.
How do I switch between sandbox and production?
Add a separate connector for each environment in your AI client, using the URL and account that match:
- Sandbox:
https://sandbox-api.shipbob.com/developer-api/mcp— sign in with your sandbox account - Production:
https://api.shipbob.com/developer-api/mcp— sign in with your production account
Is my data secure?
Yes. All communication is encrypted via HTTPS. Authentication uses OAuth 2.0 with PKCE, no long-lived API tokens are exchanged, and no data is stored or shared by the MCP server.
Do I need to generate an API token?
No. The primary setup uses OAuth in your browser — sign in with your ShipBob account, grant access on the consent screen, and you’re done. If your AI client can’t open a browser (headless automation, for example), see the ShipBob Authentication Guide for the API-token alternative.
Can I limit which tools my AI assistant can access?
The AI assistant will only perform actions you explicitly request. Your ShipBob API token’s permissions also control what actions are possible.
Support & Resources
Getting Help
If you need assistance with the ShipBob MCP Server:
- Email: techspecialists@shipbob.com
- Documentation: https://developer.shipbob.com
- API Reference: ShipBob API Docs
When Contacting Support
Please include:
- Environment: Development/Sandbox or Production
- AI Assistant and version: e.g., claude.ai, ChatGPT, Claude Desktop, Claude Code CLI, VS Code with GitHub Copilot
- Error Messages: Full error text if available
- Steps to Reproduce: What you asked your AI assistant to do
- Expected Behavior: What you expected to happen
- Actual Behavior: What actually happened